 | In part 3 (and final installment) of this series, we will talking about how short your fly spey line is needed for successful casting. Part 3 also represents the last and lone book end that caps our discussion, using the analogy mentioned in Part 1. As with part 2 on max length, the purpose of knowing your minimum length is so that you neither tire nor wear yourself first for successful casting. However, in this part 3 case, cast performed under more extreme conditions often mandates a minimum length. This tire vs. wearing out first here becomes especially important since a too-short-of-a-length would intuitively cause one to accelerate more so as to compensate for the distance-killing-properties of a shortened head. |
It is also important since this increased acceleration can also incur the wrath of blowing the anchor from a shortened anchor at the same time. I tend to think this min length should be called 'Max length under extreme casting conditions'. But we'll stay with this min. length terminology to avoid digressing and squabbling over a widely held public jargon.
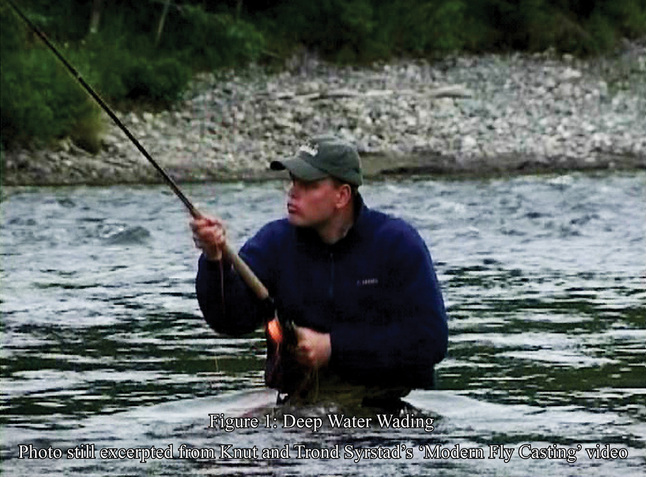
For Skagit head systems, the new minimum (floating out there on the web as of January 2012) for the combined length of head and tip is 1.75 times the rod length, shorter than the 2.5 times that had been floating around for some time. However, this new minimum requires careful timing and control, driving up the demand for diligence afforded only to those who can hone in at this level on a consistent basis. But wading deep with little back room space will make this a useable cast while taking the pressure of precise timing and control (see Figure 1 above).
As for Scandinavian shooting heads, the new minimum is around 2.3 times rod length for full sinking heads. Although there doesn't seem to be a minimum for floating heads, the suggested working length is 2.5 to 2.7 times.
But if you want venture outside of the above prescriptions and come up with your own (or at least understand the basis for minimum length) the following factors must be considered when going for minimum lengths.
Thematically, calculating the min. length- for whatever wading depth/ rod/ line sink/ fly combination- is driven by the ability to get your target distance without blowing the anchor, performing under a level of diligence that can be sustained for the period you fish. This means casting within the sweet spot of your casting rhythm that neither tires nor wears your out first (footnote 1).
Let's start with distance via proper rod loading. Hey, we all know shorter heads are distance killers. That is because the launch energy in the line system dissipates faster by a straightened out head (now pushing much like a wet spaghetti pushing a meat ball of air resistance) than when turning over itself. Although the line turnover speed are out of our hands (footnote 2), we have control in tuning our min head length so that it will achieve max launch energy via a properly loaded rod. This first tuning often requires us to bump up the class weight for line heads by one or two, or sometime three, class weights when cutting shorter heads than if cutting for max length heads for proper rod loading in both cases. This is especially true since a shorter head often precludes a V loop, leaving us with a passive D loop that needs more mass to be equivalent in resistance.
As for the second tuning for a proper anchor, if you are wading up to your armpits, casting a heavy fly and a fast sink line system, your casting technique can still greatly influence your min length even beyond the aforementioned setup conditions. For there are two casting maneuvers that will easily determine the chances of a blown anchor. The first is the angle of line stick. The second is Continuous Tension Load.
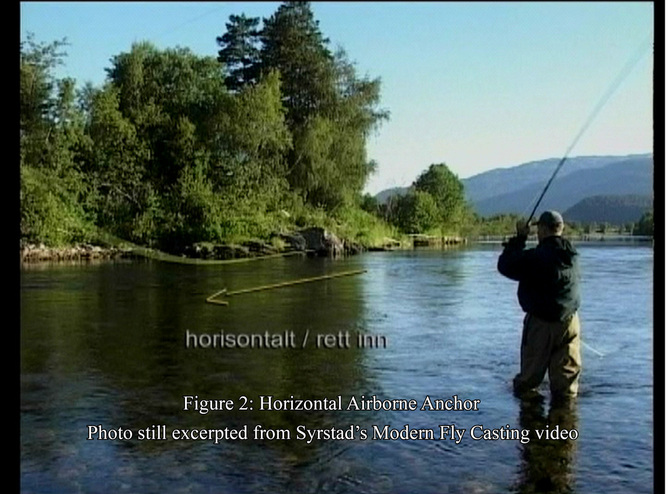
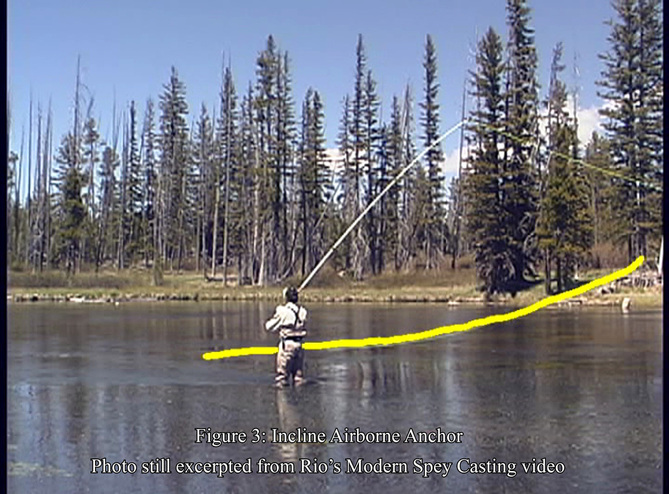
The first technique, a horizontal line stick often used in Scandinavian casting as an air borne anchor (see Figure 2 below), is much more aggressive than an Inclined line stick (see Figure 3 below). A leader/ line sticking to and being pulled along the water surface is much more aggressive anchor than one that peels off the surface. Thus, a prerequisite anchor would only require a shorter horizontal line stick than an inclined (but now longer) one (footnote 3), further helping reduce the overall line length needed for deep wading. This more aggressive line stick is accomplished by having a flat and near horizontal back cast, a back cast technique made even more important as shortening the head now only affords a reduced length for anchor (footnote 4) which by now has to be aggressive so the anchor is not blown. Incidentally, some of this anchor loss is made up when you are wading deeper.
As for Scandinavian shooting heads, the new minimum is around 2.3 times rod length for full sinking heads. Although there doesn't seem to be a minimum for floating heads, the suggested working length is 2.5 to 2.7 times.
But if you want venture outside of the above prescriptions and come up with your own (or at least understand the basis for minimum length) the following factors must be considered when going for minimum lengths.
Thematically, calculating the min. length- for whatever wading depth/ rod/ line sink/ fly combination- is driven by the ability to get your target distance without blowing the anchor, performing under a level of diligence that can be sustained for the period you fish. This means casting within the sweet spot of your casting rhythm that neither tires nor wears your out first (footnote 1).
Let's start with distance via proper rod loading. Hey, we all know shorter heads are distance killers. That is because the launch energy in the line system dissipates faster by a straightened out head (now pushing much like a wet spaghetti pushing a meat ball of air resistance) than when turning over itself. Although the line turnover speed are out of our hands (footnote 2), we have control in tuning our min head length so that it will achieve max launch energy via a properly loaded rod. This first tuning often requires us to bump up the class weight for line heads by one or two, or sometime three, class weights when cutting shorter heads than if cutting for max length heads for proper rod loading in both cases. This is especially true since a shorter head often precludes a V loop, leaving us with a passive D loop that needs more mass to be equivalent in resistance.
As for the second tuning for a proper anchor, if you are wading up to your armpits, casting a heavy fly and a fast sink line system, your casting technique can still greatly influence your min length even beyond the aforementioned setup conditions. For there are two casting maneuvers that will easily determine the chances of a blown anchor. The first is the angle of line stick. The second is Continuous Tension Load.
The first technique, a horizontal line stick often used in Scandinavian casting as an air borne anchor (see Figure 2 below), is much more aggressive than an Inclined line stick (see Figure 3 below). A leader/ line sticking to and being pulled along the water surface is much more aggressive anchor than one that peels off the surface. Thus, a prerequisite anchor would only require a shorter horizontal line stick than an inclined (but now longer) one (footnote 3), further helping reduce the overall line length needed for deep wading. This more aggressive line stick is accomplished by having a flat and near horizontal back cast, a back cast technique made even more important as shortening the head now only affords a reduced length for anchor (footnote 4) which by now has to be aggressive so the anchor is not blown. Incidentally, some of this anchor loss is made up when you are wading deeper.
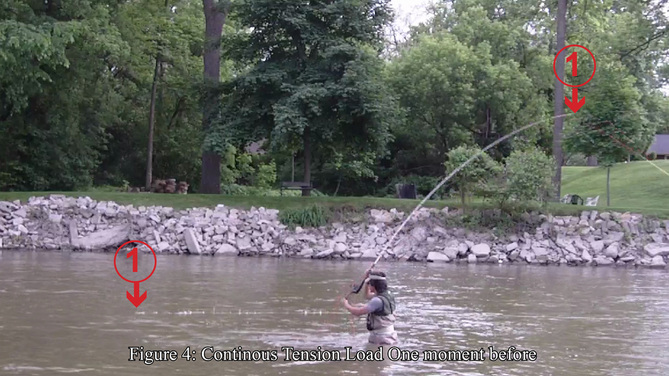
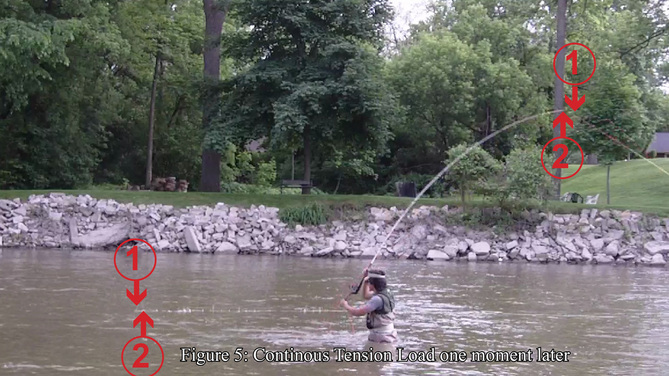
The second technique, Continuous Tension Load, is much more subtle and nuance. It is when the fly line is so energized (often after a Snake roll) that it feels like one inch of tip movement during the initial firing translates to one inch of the fly dragging along the anchor path (see Figure 4 and 5 below). There is absolutely no slack in the D loop as the D loop is in high tension and the rod tip is already in a pre-loaded state. This means the caster has to back off the power or else it would lead to an inevitable blown anchor. In fact, I often can see (and use it as a gauge for power) my fly dragging through my anchor line as I initiate the forward cast (hard to tell in Figure 5 below). This nuance technique can truly turn a 'meh' cast into a 'Wow' cast with a wind- cutting, hi- line speed; tight loops; line stretching out with authority; leading to solid turning over heavy flies.
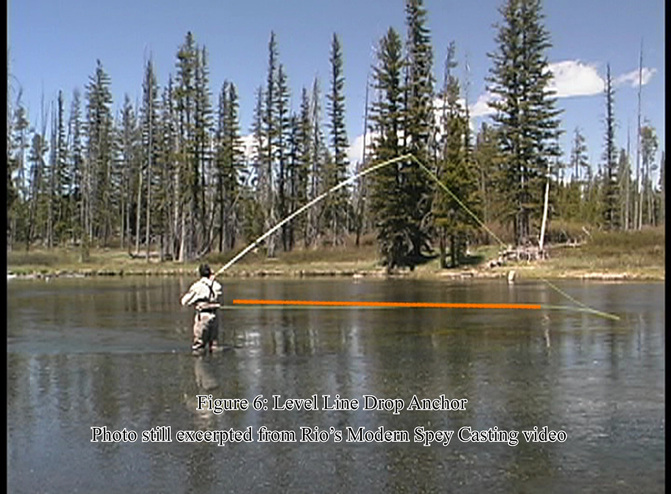
But, again as with the first technique, the shorter the head, the more passive your D loop becomes, the less energy in your D loop, the greater the angle of the incline in your line stick, the more allusive this 'Wow cast' becomes without blowing the anchor. This is further compounded by the most common error in getting a horizontal line stick via an erred back cast technique: a level line drop, a low energy back cast that starts with a high stick initiating the back cast that is on a near vertical plane sector (see Figure 6 below).
So, it becomes almost like robbing Peter to pay Paul. Ultimately, the final min length is a subtle fine tuning whereby you avoid egregiously short changing either Anchor or Continuous Tension Load. But the benefits of a shortened line system, allowing a one-swoop movement that gets the fly from hang down to out where the fish might be, may be worth the price of this compromised place where Peter and Paul are at best civil with each other. Practicality co-existing with Luxury on what often feels like a knife edge.
In a later installment, I will be addressing Rio's AFS head tapers, Generation 1 and 2, and how it affects rod loading. This installment will shed insights where to add cheaters to an existing chopped head. This way, you can have both Min and Max head for a properly loaded system simply by adding and removing this cheater.
Footnotes:
1) For casting outside this optimal window drives up the demand for a heightened diligence in her ability to reproduce similar successful conditions, but this fussing robs the caster her being-there-in-the-moment experience.
2) This is largely a product of line taper, loop control (assumed constant here), fly air resistance (assumed constant here) and running line resistance.
3) Anchor Time On Water also has an impact on air borne anchor, especially for fast sinking leaders or tips. For floating leaders that need more stick, introducing more time on water can also introduce slack in the D loop, reducing the Continuous Tension Loading. However, timing is essential for water borne anchor cast, such as the Skagit, where your sink tip and fly must be allowed to sink long enough to get sufficient anchor. The Continuous Tension Load is unaffected by water borne anchor since the loading occurrs after the anchor has performed its prerequisite sinking.
4) See three point geometry for D loop in Part 2.
 RSS Feed
